So I was in Superdrug the other day and this little beauty caught my eye. Of course I checked for parabens (I've been caught out so many times!) and decided that, at £7.99, I was going to grab them up. By the way, these beauties are cruelty free and vegan, so good for people that don't like their cosmetics tested on animals.
Normally, as an oily/combination skinned gal, I contour and highlight after powdering my skin, but it's good to change it up a bit after being stuck in the same routine year after year...
So I put on my foundation and concealer, then went to work with the contouring colour...
Oh, yeah! Check out the girl who can't even contour! Haha! The cream contour just glides on to the skin so smoothly, and it's very pigmented, which was great.
I then started blending it out with a damp Real Techniques miracle sponge. If you use less contour colour, it blends out to a very natural finish. I used a heavier hand as I wanted a more bronzed and more obvious contour.
First she can't contour, now she's pulling faces, y'all... Ahem, yeah, so once I blended out the contour, I went in with the highlight colour, which is a lightish cream colour and blended that in with the Real Techniques sponge again.
So this was the finished look, without any powder. It didn't look seamless, So I used my Real Techniques contour brush and blended my forehead and cheeks a little more, then set it with powder, finished my face around 12pm and went about my day.
And this is me at around 8pm. I have been quite impressed with this contour kit, and it's at a good price too. These are creams so they can feel and look odd upon application, but once blended out looks and feels much better and not so heavy on the skin. I personally would advise that these be set with a powder after blending too, as cream shifts and slides easily across the skin. I also found that my sponges got clogged up with the cream very quickly, so I use two Real Techniques contour brushes for blending it all out; one for the contour, one for the highlight.
I really enjoy using this kit, and will continue to use it as a nice way to change up my makeup routine. Does anyone else have this kit? I'd love to hear your thoughts xx
Showing posts with label cosmetics. Show all posts
Tuesday, 26 July 2016
Monday, 30 May 2016
Jeffree Star Velour Liquid Lipstick 'Celebrity Skin' review
I admit, I am pretty new to the Jeffrey Star bandwagon. I know, right? Shame on me! My little sister (mei mei, I love you but my wallet doesn't ;) haha) is the one that pointed me in his (infectiously brilliant) talented direction, and I have to say, once you go Jeffree Star, you ain't ever coming back... Without a makeup product with his delicious name printed on it.
My first ever purchase was this liquid lipstick, and girrrrrrrl, it was love at first swipe!
Look at this beautiful casing; so chunky, sturdy and darned cute! Normally I'm not one for packaging, but I have to say, this has got me all of a flutter.
The formulation is so smooth and light, then dries down to a matte, pink-toned brown nude that is just so gorgeous and flattering. Also, another wonderful plus is that this lipstick smells of a root beer float, which is delicious. For those that don't like scents, don't worry, the fragrance soon disappears. The formula is also gluten and paraben free, which is an absolute must for me. Anything that can be absorbed by my skin must not contain parabens!
Above is a close up of my lips. My lips are in no way symmetrical so please ignore that, but just look at the colour. I just love it! The colour wears really well, is not as drying as other long lasting lipstick formulas I have used and feels really comfortable on the lips.
Here is me from further away. Forgive how I look, it's been a while since I applied my makeup! I just love how neutral and wearable this colour is. It wears off a small amount through eating/drinking, but still holds up really well unless you eat oily foods, which will break down the formula quickly.
It removes easily with an oil based makeup remover ("Hello, Garnier, how are you today?"), so just keep that in mind should you ever buy one of this talented man's lipsticks.
Yes! Honey, I am loving this shade! I'm currently waiting as patiently as I can for another of his lipsticks 'Rich Blood' to arrive. I can't wait!
Hugs xx
My first ever purchase was this liquid lipstick, and girrrrrrrl, it was love at first swipe!
Look at this beautiful casing; so chunky, sturdy and darned cute! Normally I'm not one for packaging, but I have to say, this has got me all of a flutter.
The formulation is so smooth and light, then dries down to a matte, pink-toned brown nude that is just so gorgeous and flattering. Also, another wonderful plus is that this lipstick smells of a root beer float, which is delicious. For those that don't like scents, don't worry, the fragrance soon disappears. The formula is also gluten and paraben free, which is an absolute must for me. Anything that can be absorbed by my skin must not contain parabens!
Above is a close up of my lips. My lips are in no way symmetrical so please ignore that, but just look at the colour. I just love it! The colour wears really well, is not as drying as other long lasting lipstick formulas I have used and feels really comfortable on the lips.
Here is me from further away. Forgive how I look, it's been a while since I applied my makeup! I just love how neutral and wearable this colour is. It wears off a small amount through eating/drinking, but still holds up really well unless you eat oily foods, which will break down the formula quickly.
It removes easily with an oil based makeup remover ("Hello, Garnier, how are you today?"), so just keep that in mind should you ever buy one of this talented man's lipsticks.
Yes! Honey, I am loving this shade! I'm currently waiting as patiently as I can for another of his lipsticks 'Rich Blood' to arrive. I can't wait!
Hugs xx
Tuesday, 21 October 2014
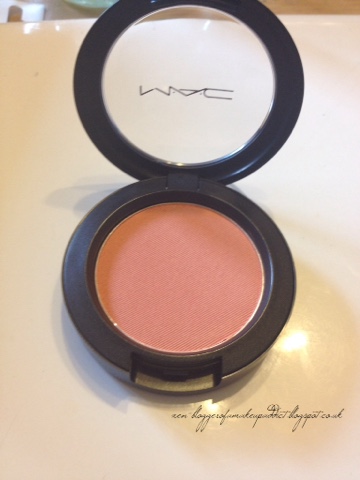
Review: MAC Blush in Style
I've been lusting after this blush from MAC for over a month, but for some reason I've felt too guilty to buy it. So when I went into MAC the other day I bought their Prep + Prime setting powder and this at the same time, but I thought I'd do separate blogs on them.
As you can see, Style is a Frost blush. It has a really plain peachy colour just sat in the pan, but when it's swatched on the skin, it's beautifully pigmented and leaves the skin with a golden-kissed shimmer.
This blush is so pigmented, too much can be applied quite easily, so being light handed is key. It reminds me of Sleek blush 'Rose Gold', but this one suits my fake tan better - being peachy instead of pink-based.
This will definitely be my go-to blush for the autumn and winter months - hell, probably for the foreseeable future - and I'm looking forward to using it in different makeup looks. Love it or hate it? Let me know x
Monday, 20 October 2014
MAC Prep + Prime Transparent Finishing Powder
I've been wanting to add this setting powder to my makeup collection for a good long while now, and now I have it... *Cue evil laughter*
So I wanted to do a first impression/review on this product.
This box is actually pretty cute, which is saying something because I'm not all that hot on packaging.
The powder is white, but according to MAC, this powder will suit all skin colours once it's applied/blended in.
Apparently this powder is good for oily skin, and has very positive reviews on the MAC website and also on Makeup Alley and across the web. I have combination oily skin so I had to try this out...
I applied my eye makeup and brows, then applied Estée Lauder Double Wear foundation and contoured with bronzer and let it set...
Then I applied the setting powder in small amounts in small circular motions, concentrating on my nose and inner cheeks nearest my nose, where I'm definitely the oiliest.
After I had applied it, my skin felt super smooth and my huge pores on my inner cheeks looked much smaller, and the pores on my nose looked smaller too. There was also no white powder showing on my skin either, so good news there.
The finish wasn't too matte either, so it looked more natural. Plus there is no build up of colour over my foundation, so my face stays cake-free - thumbs up. For a proper review, I didn't use any oil controlling primer under my foundation as I wanted to see how well the powder would control my oily skin.
I also thought I'd do a photography flash test too, to see if there was flashback. Let's check for "ghost face", using my iPhone's flash.
I think I'm pretty safe from that, I reckon... But what about oil control? I applied the powder at around 3pm, then checked my face six hours later...
Sorry for super creepy closeup! My nose and inner cheeks could definitely do with a little blot and maybe a little extra powder, but it didn't do too badly on my face.
With an oil controlling primer, I don't doubt that this powder will keep the oil at bay for at least ten hours.
Thoughts?: It's relatively expensive at £20.50 but a little goes a long way. Loose powder is not exactly travel friendly, so the pressed version is probably more desirable for those purposes. It makes my skin feel amazing after application, doesn't create "ghost face" or "cake face" and doesn't do a terrible job at keeping my oil at bay, so it's a good all-rounder.
Labels:
beauty,
Blog,
cosmetics,
first impression,
images,
loose,
MAC,
makeup,
pictures,
powder,
Prep and Prime,
review,
selfie,
setting,
thoughts,
transparent
Wednesday, 1 October 2014
Good News!
So I've been cray cray busy recently. My shifts went from week nights to weekend days, and I spent the first week trying to readjust my sleeping pattern, so I was grouchy and miserable. But then I realised I had 4 days off a week... So I decided to bite the bullet and apply for a Beauty Therapy course in a local college and a different college around 6 miles away, even though the courses started around 2nd Sep.
The first college invited me in with open arms, but said their fees for the year would be £1,672 - I had to refuse as I don't have that kind of moolah!
I was turned down by the second college; their course was now full, but they'd keep me on hold if a space became available. Their course covered exactly the same things as the first college, but their fees were substantially lower, at around £816, which, in my job, part of the country and economy, this seemingly meagre sum of money was still far from my reach. I talked to my mother about it, and she said if I really wanted a future in beauty (definitely!) then she'd loan me the money. But because I'd been denied, I said no, it'd give me time to save up to pay for some of the course that started in January 2015.
BUT! Just two days after being denied, I received a phone call from the second college, asking me to attend an interview; they'd decided to expand their classes and many more people - myself included - were asked to interview.
I was ecstatic, overjoyed, nervous, and then frightened to death - I couldn't afford the course, just after saying no to my mum for her help! So I told her about the interview, and she gave me £750 to pay for my course when I attended and was accepted!
So this is the makeup & nails I wore for my interview and for my first day at college (I was accepted & started the same day). Unfortunately it was "Facial day", so all my hard work was cleansed right off my face within minutes of being in class. I was also told to ditch my fake nails (I've been wearing fake nails solidly for around 4 years) until the course finishes next June.
So... Yeah, now my nails look like this:
On the two days I have off a week, I'll be studying and trying to catch up on the work that I've missed out on, and I'll also try really hard to blog as often as possible. So sorry if my blog lags a little bit - I'll try my best to keep you peeps up to date with my beauty bites!
Catch you lovelies soon, this is part-time college girl, over and out!
Labels:
adult learner,
bare nails.,
beauty,
beauty therapy,
Blog,
College,
cosmetics,
course,
courses,
experiences,
Gel,
happy,
images,
learning,
level 2,
makeup,
manicure,
nail polish,
nails
Wednesday, 17 September 2014
Urban Decay Naked 3 Palette Swatches!
Yes, yes, oh God, yes!!! Ahem... I mean... So my Naked 3 palette turned up today and I wasn't excited in the slightest *cough, lie! cough*.
I've been wanting to get this palette since I first saw Kandee Johnson (amazing girl from YouTube, I adore her) show this palette last year. And now it's mine at last!!! Mwahahahahahaaaaaa!!!
I do apologise! And now for the rest of my blog...
So before I show you the shadows, I'll show you a neat little freebie that Urban Decay have kindly added for their buyers so that they can make the most of their eyeshadows...
There's a booklet, and inside this booklet there are four - yes, four - samples of their famous eyeshadow primer.
They're tucked handily in the sleeves in this booklet, with each different primer's name, colour and effect written on the package for your convenience.
I think that these are a brilliant way to advertise their own primers for anyone that hasn't tried them so they can make up their mind. I used to be a huge fan of UD e/s primer (original) but ended up using MAC Paint Pots.
Anyway, swatch time!
I am so excited to use this palette; the first eight colours are light enough for me to use on a regular basis (with Naked 2 I can only use the first five - the rest are too dark or too grey), the colours are beautiful, pigmented, creamy and a delight to use. I am very happy with this palette indeed!
As for the primers, I won't be using the samples, I'll stick with my Paint Pots. I had a very bad experience with UD Sin (creased within an hour, no matter how I applied it) so I'm not tempted to use anything but the original, but I'm hoping my sister might take these off my hands... *hint hint, mei mei!*
Do you like/hate the Naked Palettes? Got a palette you recommend? I'd love to know xx
Sunday, 3 August 2014
Review: Maybelline Lasting Drama 36h Gel Liner Pen Black Shock
Wow. That is one long title right there! Any longer and it would have it's own postcode haha. Aaaanyway, on to my review...
When we were purusing through the drugstore, it wasn't me that spotted this pen style gel liner, it was my hubby. I am a huge (and I really mean huge) fan of the Lasting Drama gel liner in the little pots that come with their own brush. Maybelline's gel liner lasts longer on my waterline than any other gel liner I've tried; for me it's a winner - so when my hubster pointed it out in store, I simply knew I had to have it.
It has a screw on cap and a rubbery pen-like nib with a slanted hole. You have to twist the bottom of the pen around 20-30 times to get the gel up through the nib for the first time (I can't actually remember, I lost count after twisting it 3 clicks at a time for a short while).
The gel that comes out is quite thick and very opaque. It also comes out thicker where the hole is widest, so it is hard to apply evenly...
As seen above, it all splodged onto my hand as I dragged it across. I tried clicking the gel out of the nib, smearing it across the opening so it covered the edge a little more evenly, and then I applied it to my upper lash line.
And lastly, adding it to my waterline (upper and lower) and adding Red Cherry lashes (number 43). Please excuse my face, I have swollen sinuses and I'm in a fair amount of pain, so I look a bit crap... But I just wanted to show the eyeliner from a distance!
My thoughts: I like this gel liner, but I do find it quite strange to use. I think I prefer using the brush to apply the eyeliner as I have more control over how much I use, whereas the pen liner has a lot less control and there is more waste.
The liner broke up on my waterline pretty quickly, but I think that's because my eyes are watering more than normal.
To remove, just use an oil based makeup remover and a cotton pad.
It comes off really easily with Garnier Simply Essentials Soothing 2 in 1 makeup remover, which is cheap at only £3 and the oil in it will dissolve the eyeliner quickly, which won't be unkind to your skin.
Labels:
beauty,
black shock,
Blog,
cosmetics,
Drugstore,
gel liner,
how to,
images,
lasting drama,
makeup,
maybelline,
pen,
pictures,
removal,
review,
selfie,
thoughts
Subscribe to:
Posts (Atom)